How to Convert a 4 Shaft Draft to Weave on 3 Heddles
Converting a weaving draft to work on a Rigid Heddle Loom is easier than it seems—once you understand the logic behind it!
In this tutorial, I’ll show you how I “cracked the code”, allowing me to weave any 4-shaft pattern on my Kromski Harp Forte using three heddles.

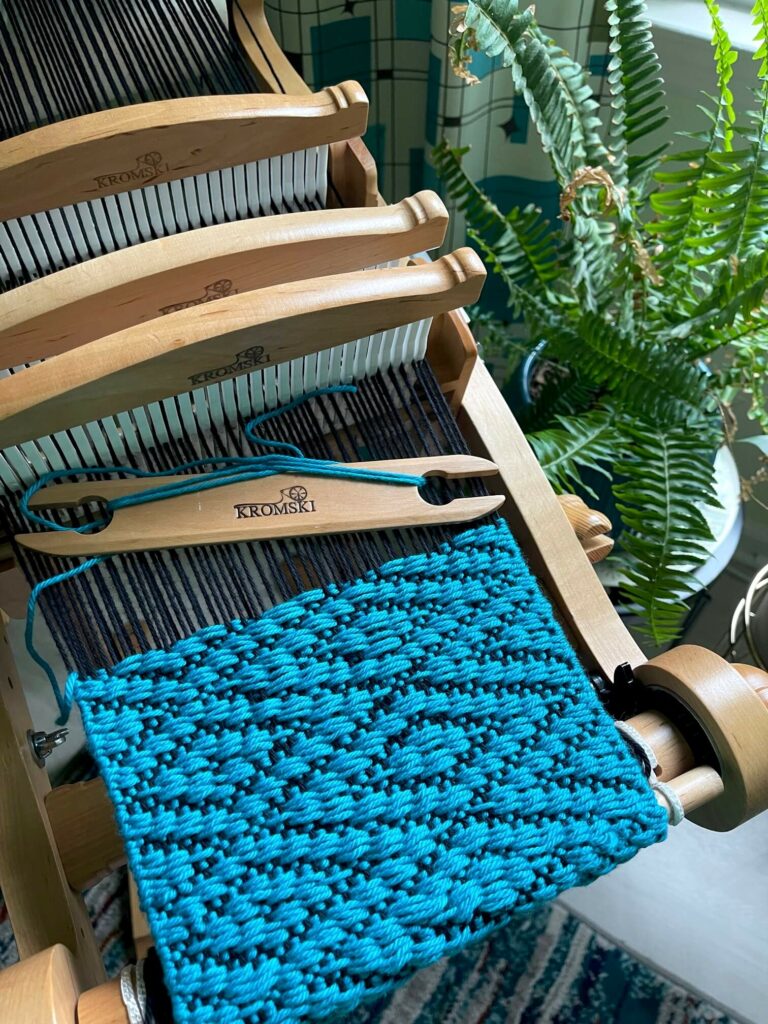
To begin, I chose a simple twill design. I’ve drawn mine out, but this method works with any 4-shaft pattern you find.
The pattern I’m using is an Advancing 2/2 Twill, which simply means that 2 weft threads cross over every 2 warp threads, creating a classic diagonal design.
Let’s begin by transposing this draft onto a template. You can find a blank template in the PDF at the end, which you can print and use to create any pattern you like.
In this template, the numbers represent the shaft numbers from a 4-shaft loom. Shaft 1 is closest to the weaver. I’ve arranged my numbers in the same order as in the draft above.
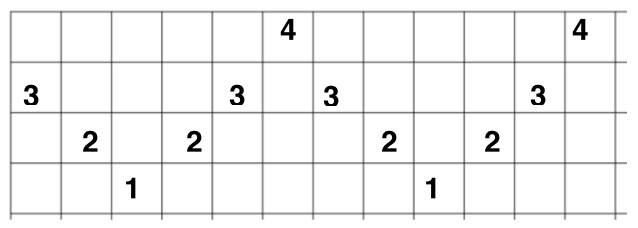
Image #1
Next, let’s take a look at the rigid heddle. Imagine that there are three heddles together. It would look something like image #2 below. The circles represent the holes in the heddles, and the spaces between are the slots.

Now you might be wondering: “What about the 4th shaft?”
Picture what happens when the heddle is raised while weaving with a single heddle. The threads in the holes are lifted, and shaft #1 is engaged. When the heddle is lowered, shaft #2 is engaged because now the threads in the slots are above the threads being pulled down by the holes.
The 4th shaft is created by the threads that go through the slots only, so the other heddles must be lowered. We’ll discuss this in more detail later.
For now, let’s continue planning our warp. Image #3 below shows the yarn as it will come through the slots on the rear heddle when we initially warp using the direct warp method. There will be 2 strands of yarn (one loop) through each slot. This image is for visual reference to help keep you on track as you draw out your heddle plan.

Now things get interesting…
It’s time to add the other heddles!
The diagram below shows how the yarn will travel through the heddles. Remember that when reading a weaving draft, we work from right to left. I’ve colored the yarn in the diagram to make the paths easier to follow:
- Shaft #4 – purple
- Shaft #3 – green
- Shaft #2 – gold
- Shaft #1 – red
Look back at the original template (image #1). Beginning on the right, the first thread will be on shaft #4. Draw a line from the yarn in image #3, which represents the yarn as it comes through the rear heddle when initially direct warped. This thread is indicated by the purple arrow.
The next thread travels through the hole on heddle 3 and back into the slots for heddles 2 and 1. This thread is indicated by the green arrow.
The following thread from shaft #2 goes through the slot on heddle 3, into the hole on heddle 2, and back into the slot on heddle 1.
The next thread passes through the slots on heddles 3 and 2, then into the hole on heddle 1.
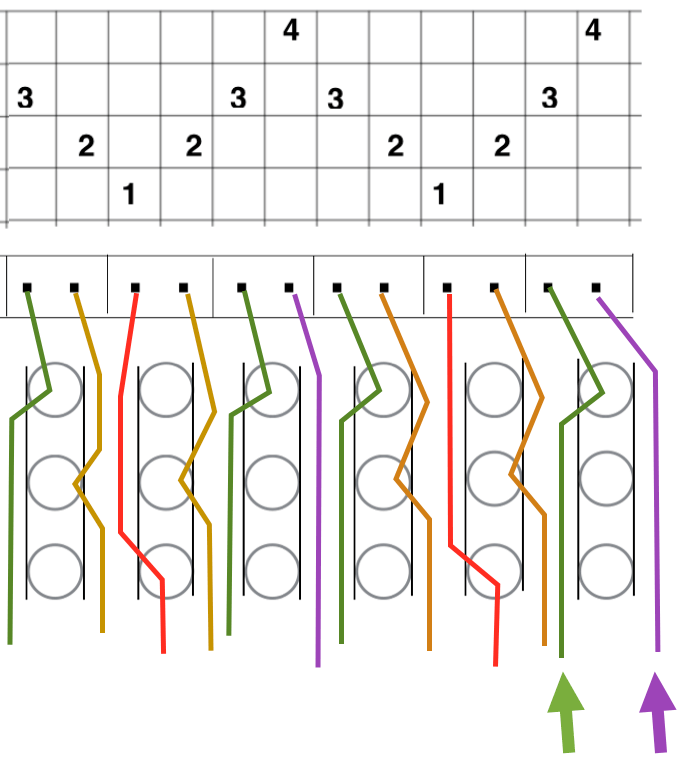
Continue in this way to draw out the remaining warp pattern.
Important: Notice that the threads do not cross each other. When creating your warp plan, the most crucial rule is: yarn cannot pass over or under another yarn.
Refer to the examples provided—these show what not to do. Avoid any overlaps, tangles, or crossings, as they will affect both the threading and the final woven pattern.
If the first thread had gone in the slot to the left as shown here, the yarns would cross the other. Therefore, it will need to go in the slot to the right.
Likewise, if the 3rd thread, (gold) traveled through the hole to the right instead of the left, the threads would cross.
Once we understand this, the rest of our layout is fairly easy.
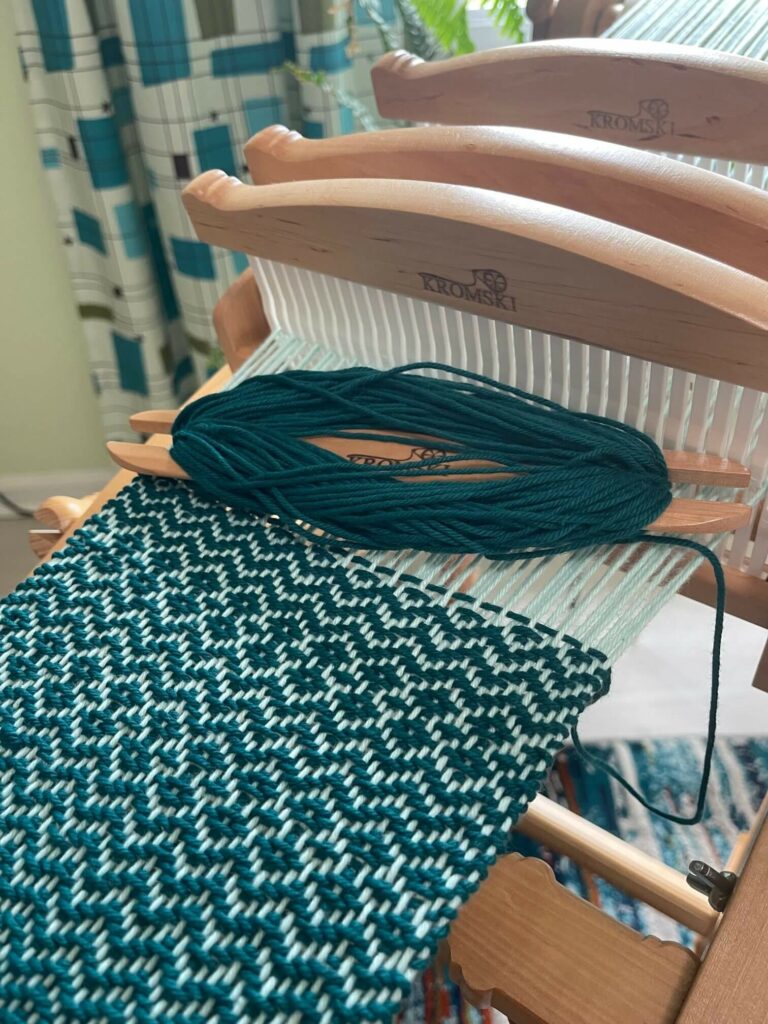
Once the first heddle is warped and the warp is wound onto the back beam, it’s time to prepare for weaving:
- Check the tension – Make sure all threads are even and properly tensioned across the width of the loom. Adjust if necessary.
- Add floating selvages (optional) – If your pattern needs even edges, add 1 thread at each side to act as a floating selvage. Wrap it around each pass of the weft to keep the edges straight.
- Thread the heddles for the pattern – Follow your drawn layout to place the threads in the correct slots and holes on any additional heddles. Make sure threads do not cross over each other.
- Prepare for weaving – Wind your weft yarn onto your shuttle, and weave a few rows of waste yarn or plain weave to secure the warp before beginning your pattern.
Now your loom is ready, and you can start weaving the zig-zag or other pattern you planned!

Note: Some patterns need an added extra thread at each end to be used as a floating selvage edge. A selvage edge runs through the slots or outside the heddle itself. Each time the weft is passed through the shed it must go around this thread. This will keep the edges even where there may otherwise be no warp to support the weft. They are best to added after the warp is wound be cause they do not take up in the same way as the patterned threads. Hang weights on them to keep them tensioned. For the basic zig-zag pattern it is not necessary.
Exactly! Securing the back heddle makes threading much easier and keeps your warp evenly spaced. Here’s a clear approach:
- Raise the back heddle – Lift it into position and hold it there.
- Tie it in place – Use a bit of waste yarn to tie the top of the heddle to the front of the loom. Wrap the yarn around the top bar of the heddle, then tie it to the front beam or warp rod.
- Support both sides – For extra stability, you can tie both ends of the heddle to the front of the loom, ensuring it won’t shift while threading.
- Start threading the warp – Following your diagram, carefully pull each warp thread through its designated slot or hole. Take your time to avoid crossing threads.
This setup keeps the heddle steady and makes threading more accurate and less frustrating. Once all threads are in place, you can remove the waste yarn supports and continue weaving.
If you want, I can outline a step-by-step “threading checklist” to make sure none of the 62 ends get mixed up. Do you want me to do that?
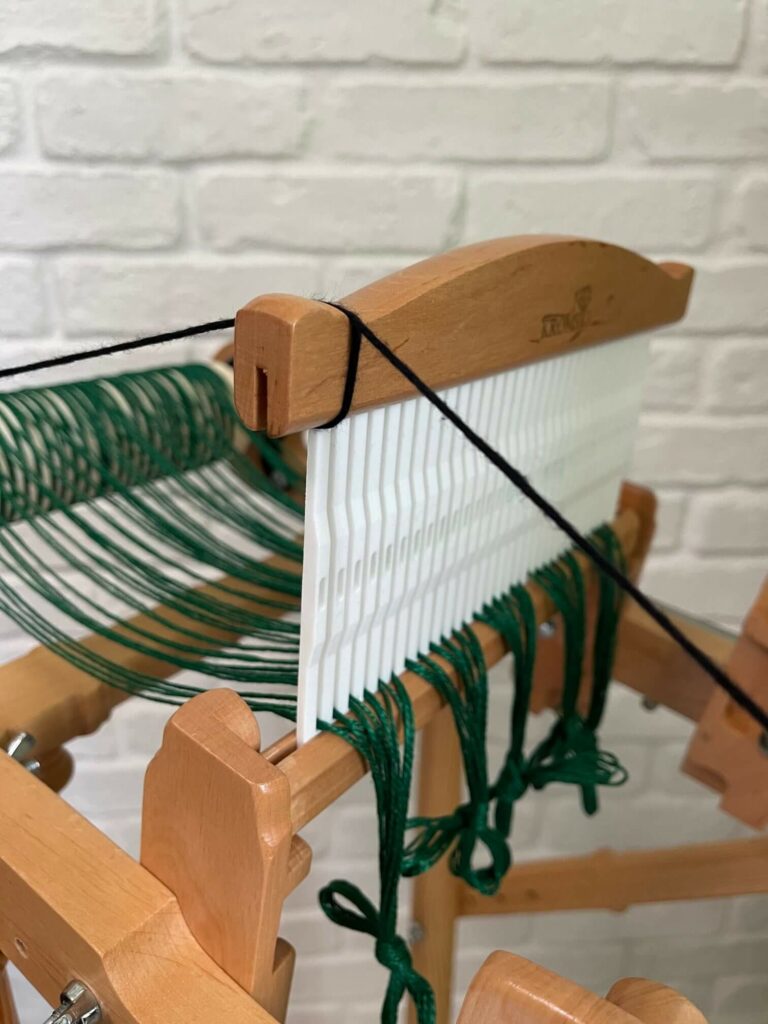
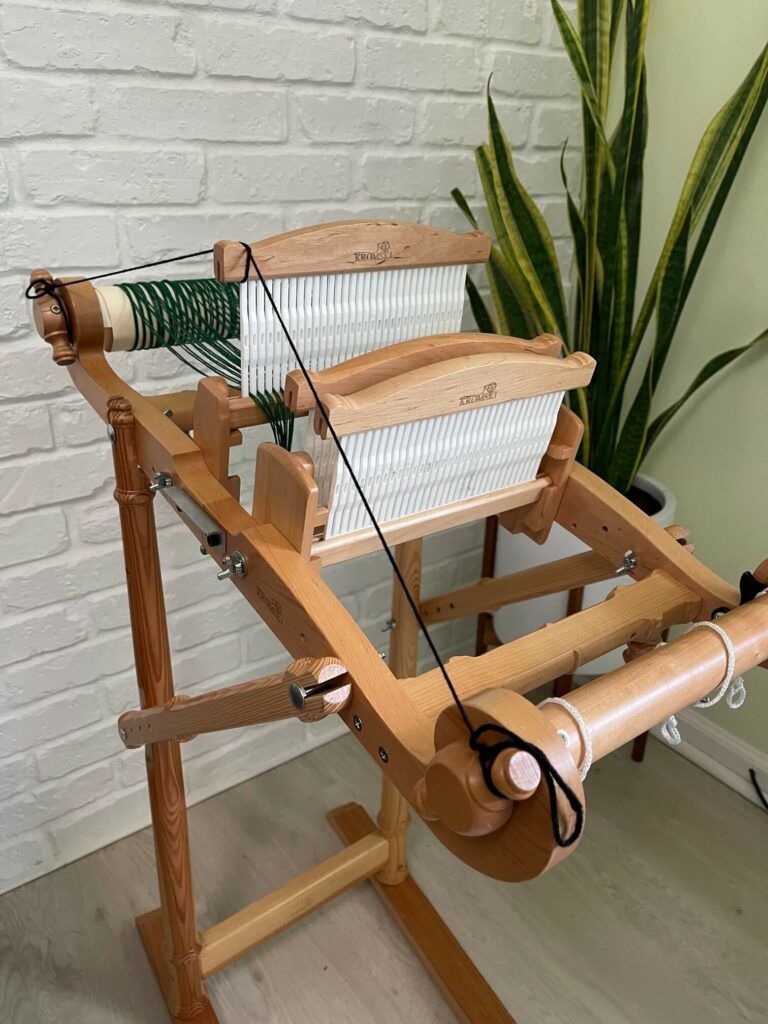

Note: This is a different project in the photos, but it’s the same concept.
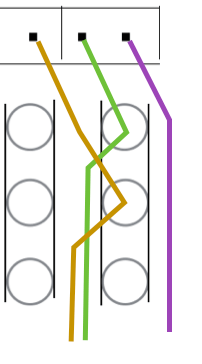
Look at the pattern we have drawn out for slot/hole placement.

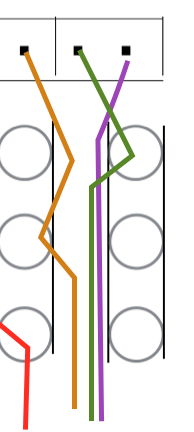
The 1st thread (purple on diagram) runs through all 3 slots. Therefore, we leave it in the rear heddle, right where it is.
Use the threading hook to reach through the front two heddles at the same time and draw the yarn through both slots.

The next thread (green) needs to be removed from the slot and placed into the hole on the 3rd heddle, then through the slots on heddles 1 and 2. This can again be done by putting the threading hook through both the slots at the same time.
Pay careful attention to which slots you use.

The next thread (gold) will stay in the slot on the 3rd heddle.
Take the threading hook though the slot in the 1st heddle and through the hole on the second heddle at the same time to grab the yarn.
Exactly! That tie-up block is essentially your “cheat sheet” for which heddles to lift (or lower) on each pick to achieve the pattern. Here’s how to interpret it for your rigid heddle setup:
- Each square = a shaft engaged – In a floor loom draft, each square in the tie-up represents a shaft that will be lifted by that treadle. On a rigid heddle, this tells you which heddle(s) need to be raised or lowered for that pick.
- Assign heddles to shafts – Since you have 3 heddles:
- Heddle 1 → Shaft 1
- Heddle 2 → Shaft 2
- Heddle 3 → Shaft 3
- Shaft 4 is created by threads only in the slots (all heddles down).
- Read the draft right to left – Each column in the tie-up represents one pick. Start at the rightmost column and move left, lifting/lowering heddles according to which squares are filled.
- Make a lift plan – For example, if a column shows shafts 1 and 3 engaged:
- Lift Heddle 1 (holes)
- Heddle 2 stays neutral
- Lift Heddle 3 (holes)
- Threads in slots only act as Shaft 4
- Repeat for the pattern – Continue across the draft, and the sequence becomes your repeat for weaving. You can even write it out as a step-by-step list of heddle positions to make following the pattern easier.
Once you have this lift sequence, weaving is just a matter of following it pick by pick.
If you like, I can make a visual guide showing your 3-heddle rigid heddle setup mapped to a 4-shaft draft, so it’s much easier to follow while weaving. Do you want me to do that?
Our tie-up looks like this:
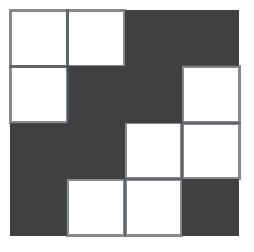
The dark blocks are the shafts that need to be engaged.
The bottom row is shaft one and the top is shaft four.
Below that on the draft is the treadling order – or heddle lift order in this case.

Exactly! You’ve got the logic down. On a rigid heddle with 3 heddles, the “missing” 4th shaft is represented by threads in slots that aren’t lifted by any heddle. So whenever the draft calls for Shaft 4 to be engaged, you manipulate the other heddles so the slot threads are effectively “lifted” by lowering the non-needed heddles.
To summarize your four steps in rigid heddle terms:
- Shafts 1 & 2 engaged (yellow) → Lift Heddles 1 & 2 (Up)
- Shafts 2 & 3 engaged (blue) → Lift Heddles 2 & 3 (Up)
- Shafts 3 & 4 engaged (red) → Lift Heddle 3 (Up), lower Heddles 1 & 2 (Down) to let the slot threads act as Shaft 4
- Shafts 1 & 4 engaged (green) → Lift Heddle 1 (Up), lower Heddles 2 & 3 (Down) so the slot threads represent Shaft 4
This is the key principle for simulating 4-shaft weaving on a 3-heddle rigid heddle loom. Each pick is just a combination of “Up” and “Down” heddles to mimic the floor loom tie-up.
If you want, I can make a quick table or visual chart showing exactly which heddles are Up/Down for each pick so you can follow it easily while weaving. It’ll save you from checking the draft every time. Do you want me to do that?
Continue to repeat this sequence as you weave.
It may be easier for some, particularly for more complex patterns to write it out like so:
1,2 Up
2,3 Up
1,2 Down
2,3 Down
This will give you the basic zig-zag design if it is repeated throughout.
Have fun and experiment with the lift order for a different look!
Try the pattern below – or play around with your own design!