


I like your handy needle nose oil bottle. What is in it?
You do not need anything fancy for your oil. Just use what you have on hand for your car or lawn mower. Something like a 30 weight oil.
I am surprised by the use of leather bearings to hold the flyers on some Kromski wheels. Is this a good idea?
First, leather has been used for a long time and not just because plastic hadn’t been invented. Both leather and plastic type bearings have advantages. Leather is porous; as such, it holds oil in the open spaces and this allows the oil to move about and do its work. Saturate leather with oil when it is first new and it will hold the excess oil to allow it to lubricate parts long after you applied the oil. Add oil once when you sit to spin and you are good to go. You can not over oil a leather, so too much is not a concern. Leather will do a better job of holding oil in place for lubricating than a harder surface, so it requires less frequent re-oil.
When I treadle on my wheel it feels sluggish, but less so when I change the ratio. Why is this?
As an engineer would tell you, this has to do with rules regarding the transfer of power from one part to another. Simply put, it is easier for a drive band to rotate a larger pulley than it is to rotate a smaller pulley. The force is something you will feel in the treadles and it can be very noticeable. This feel can also be influenced by unnecessary tension on your drive band. Be sure to view the video below on this point. You never want the drive band over tensioned.
I love your videos and particularly the ones about wheel maintenance but it would be good if I had it all written down. Can you provide something written?
How do I handle squeaks on my wheel?
Lubrication. Tighten parts. You have a machine in front of you and it has moving parts. You have wood parts that may fit together but are not glued. You should have a regular program for lubricating moving parts and checking the fit where parts come together, tightening as needed.
How do I get a poly drive band on my wheel since it is already joined? Can I cut it and join it myself?
What to do will be different for each wheel. On your Sonata and Fantasia, remove the footmen from the crank to get access so the drive band can be placed into position. On our Prelude and Interlude single drive wheels and on the Symphony and Polonaise, you will need to lift the drive wheel from the wheel posts so you can drop the drive band in place. The Minstrel may have you wanting to join the poly band in place on the wheel. This is not difficult. Position the poly band around the wheel twice (its normal position). Grip both ends. Have someone hold a lighter for you. Bring the 2 ends into the flame to melt the plastic, then butt the 2 pieces together and hold for 10-20 seconds. Wait a minute or two then test by snapping the joint. Should it fail, cut at the joint, trim ends and try again. You can also remove the three bolts from the bottom side of he bench and wiggle the 3 posts out so the drive band can be properly placed.
I need to make a new drive band. How long should it be?
Here are the details: Sonata poly – 68″ Prelude poly – 70″ Interlude poly – 75″ Fantasia poly – 62.5″ Minstrel string – 132″ Minstrel poly – 124″ Symphony string – 175″ Symphony poly – 169″ Polonaise string – 170″ Polonaise poly – 163.5″ Mazurka string – 125″ Mazurka poly – 120″ Note for string lengths that you will be trimming so extra length is a good thing.
In the future we will have two Kromski wheels in our family. Please confirm what parts can be shared between these wheels?
Thanks for your purchase of Kromski wheels. The regular Kromski bobbin will fit all the Kromski wheels. And the jumbo bobbins will fit all the Kromski jumbo flyers. Our single drive Sonata, Prelude and Interlude can share the Faster Flyer and the Jumbo flyer. The Jumbo Kit does require a jumbo front maiden post for the wheels being used, so you will need to purchase just the front maiden for that second wheel Our double drive wheels – Minstrel, Symphony and Polonaise – also can share the Jumbo Kit, but again, you will need to have the jumbo front maiden for both wheels you own.
I have a double drive spinning wheel that does not have a drive band. What should I use for the band and how does it go on?
There is no secret material that needs to be used for a drive band. I know spinners that “spin” their drive band. Perhaps the only consideration to keep in mind is that with double drive wheels you will want a string thickness that is similar to your original band as there is a “fit” to the whorl and bobbin pulley that is important. Use hemp, cotton or similar material. Do not choose a string that is slick; there has to be friction between the drive band and wheel parts.
I have trouble tensioning my drive band. I never know if it is too tight, not tight enough or if it really matters. How do I know?
The simple answer is this – you want only that amount of tension that makes your wheel work properly. No more. Excess or excessive tension will not make your wheel work better; it will make it harder to treadle to the point that you might think you are exercising, not spinning. If you think you need excessive tension to make things work, your problem is elsewhere and not with the tension. Also note that on double drive wheels, the tension of the drive band is what also controls take-up. If you have a need for more drive tension, your take-up force will also increase. Just a little adjustment is normally what you need.
When I treadle, I find my wheel moving away from me; is there a way to have it stay in one location?
There are a couple of solutions. If possible, move to a floor with carpet or a rug. You can also add rubber pads to the legs or the floor frame of the wheel.
I am looking to buy a wheel and I like the traditional look of many of the Kromski wheels. They look like the real thing. But I am hearing that the location of the orifice is an important factor for spinners. Please talk about the Kromski wheels and location of the orifice.
There are a number of opinions on this subject, so let me give you mine. I don’t think it matters much. All Kromski flyers use a round orifice which provides great freedom to position your hand anywhere you want. See my video on the subject as I demonstrate orifice location.
Perhaps it is where I live – the Northwest – but I see a bit of rust on my orifice and I have only had it a couple of months. What should I do?
This is easy to clean up and a bit of care will prevent it from happening. Use steel wool or fine sandpaper and burnish the metal. To prevent, just wipe some of your lubricating oil on the metal. Or you could also wipe on some paste furniture wax and then buff.
I have a new Kromski Symphony and can’t seem to get everything to turn correctly – wheel, flyer, etc. Just won’t work. I think it has to do with the brake band getting caught on the drive band. I am a new spinner.
Everything should turn and move easily. If not, you’ll need to make adjustments. But first let’s talk about that brake band. Remember that this wheel is, by design, a double drive wheel that can also be set-up to be used as a single drive with Scotch tension braking. BUT, these two systems are never used in combination. If you are set-up for double drive, your Scotch tension brake band is not being used at all. It should be below the flyer and out of the way. My guess is that you have the brake band on the bobbin in addition to the drive band.
My Kromski wheel is not as quiet as other wheels in my spin group. Should it be quiet? What noise should a wheel make?
If your wheel is making unusual noise, then there is probably an adjustment or some location that needs lubrication. You will have to determine the source by isolating various parts of your wheel, for example, remove the drive band from the flyer and wheel and treadle; if the noise goes away, then it is likely some issue with the flyer/bobbin or some adjustment to parts on the mother-of-all. But also remember that a spinning wheel will be making some “noise” as it is being used. They are not silent machines. Also consider the value of some audible feedback from your wheel. Audible clues from your wheel are a great way to monitor your treadling cadence so that you can maintain a constant rate of twist.
My new Kromski will not pull in the yarn. I have adjusted the tension both ways and it might work for an instant but then it stops. What is wrong?
Take-up is one of those magical things with a spinning wheel. How does it do it?? Put simply, take-up on a single drive wheel with Scotch tension braking is controlled and adjusted with just the tension on the brake band (drive band tension has no effect). A properly set up and adjusted wheel will only need the tension spring to be slightly opened. Heavier yarns and a bobbin with lots of yarn on it will require more tension to work. On double drive wheels, take-up is controlled only by adjustment to the drive band. If you are a new spinner, do this little test to get the feel of success when take-up works correctly. Get a length of yarn, maybe 10-12 feet, and thread thru orifice, along hooks and tape to the bobbin core. Now treadle and feel the yarn in your hand; if it does not take-up, increase tension (brake band on single drive wheels, drive band on double drive) until the yarn will slip thru your hand and on to the bobbin. If this take-up feel is too aggressive, reduce tension.
I am getting way too much twist in my yarn. How do I stop it from getting this way?
This is a typical problem for beginners, with some additional practice you will learn how to control it. First, stop treadling and draft out the fibers so that some of that “extra” twist will dissipate into new, untwisted fibers. Your wheel does not need to be turning for twist to work back into new fibers. If need be, walk the yarn onto the bobbin by hand until you are ready to try again. Be sure you are using the slowest possible speed ratio at the flyer. Make sure your fiber is well prepared so you are not dealing with fiber problems as you try to spin. Finally, slow those feet down and try again. Learn to treadle slowly.
I can spin and make yarn but when I try to ply, the yarn does not take up very well. What is wrong? I have a Prelude.
Here is one possibility for single drive wheels. When you spin yarn, the brake band and spring work to allow take-up of yarn. Our assembly instructions have you locating the spring on the left side of the flyer while you typically have the wheel rotating clockwise. However, when you ply, your wheel is going counter-clockwise and the brake band and spring will not work as well. So when you switch from spinning to plying, do this: route the brake band so that the spring is now on the right side; the band going up and over the bobbin to the left side hook then over the top of the mother-of-all base to your adjusting peg. This should do it. See the video below for more information.
I have one of your Symphony wheels. I will be spinning along just fine and suddenly my flyer jumps off the wheel. Tell me what to do.
Obviously, something is amiss. I suggest that the two maiden posts are not properly set-up or perhaps are not tight in their mounting holes. The leather bearings on these two posts should be parallel with each other, or perhaps even turned in towards the flyer just a bit. If the posts are not secure in the mounting holes, wrap some masking tape around the base of the posts so they fit tightly and can not rotate during operation. Also, remember that humidity may be playing with the fit of maidens to the holes.
I have had my Kromski wheel for about a year and it’s has had its share of bumps and a run-in with the dog. Do you suggest a good way to fix the wood?
Perhaps all you need is a little furniture wax – spray or paste. Apply and buff the surface. This will do a lot to improve the look. But my main thought is that your wheel is a machine that serves you, not a piece of furniture. In the normal course of using your wheel things will happen, just remember to have fun.
Should I glue in the legs of my spinning wheel?
Out of the box, the fit of legs to the bench is normally very firm. But all wood is prone to movement caused by humidity – or lack there of. So unless you see a need to be removing legs in the future and you have noted the proper alignment of the legs, go ahead and glue. Be sure to drive the legs in all the way by using a mallet or hammer. The sound of the tapping will change when the leg bottoms out. Also as an alternative, wood screws could be used to secure legs to the bench.
The Screw in the main post of my Sonata came out. What do I do?
If the female part of the screw comes out of the main post, we recommend that you carefully glue it back into the hole using a glue that is designed to adhere metal to wood. Follow the manufactures instructions on the glue for best results.
Must I use my Harp with a stand?
Not at all. Traditionally, rigid heddle looms were used by angling the loom from your lap up to a table edge or counter top. This is a very good way to use your Harp. But if you want to weave where there is no table or other suitable support, then consider a floor stand.
Can I use a second heddle with the Harp?
Yes. All Kromski rigid heddle looms allow for the installation of a second set of heddle blocks – positioned just behind the first set. Just add a second heddle of the same dent size.
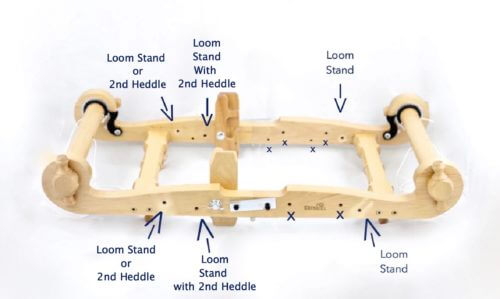
What are the holes for on the Harp Forte?
I don’t see a Warp Helper being offered for other brands of looms. Why does it come with the Harp and what are its advantages?
There are many ways to work with your warp when you are threading the heddle and getting ready to attach to the rear beam. Our Warp Helper gives you a 3rd hand to make all of this easier and keep you organized. Be sure to watch how it is done on our video of a first project – located on the Harp page.
Is a 32″ Harp too large for some people?
While 32″ may seem large, it will not be a factor. Do a test. Hold your arms out to your sides and calculate the distance from elbow to elbow. Divide by two. Compare this to the reach needed for a 32″ loom (about 18″). Even for children, a 32″ Harp will work fine.
I want to weave rugs on my Harp. Can I?
Two answers here. Yes and “should you?” Rugs that are to be walked on (as opposed to a rug that is decorative and to be hung on a wall) will need a great amount of warp tension while on the loom and your weft will need to be beaten into the warp with a great amount of “vigor.” Because any rigid heddle loom is, by design, lightweight, this factor should be considered if you are thinking rugs. As a point of comparison, rug weavers normally use looms that have beams that are 4-6″ plus in diameter, frames made with 4-6″ thick timbers and weigh 300-400 pounds. So again, our answer is yes and “should you?”
While weaving on my Harp, I have instances where the tension lets loose. What am I doing wrong?
This may be the number one question we receive about weaving. The genesis of this problem can normally be traced back to the quality of the warp you have tensioned and wound on the back beam. Your warp must be wound on with significant tension and that tension must be maintained from the first rotation of the back beam to the last rotation. We suggest two things that will help: First, always have two people wind on the warp. It is not possible to do this by yourself and get good results, as you will discover. Second, be sure to use a good material for your warp foundation. We suggest our beam sticks. These, along with that second person helping you will get the job done correctly and will remove the problem you describe.
How do I know what rigid heddle dent size to use?
What is important to always consider is that the warp you want to use must work appropriately with your heddle selection. What does that mean? Your warp must pass through the holes and slots on your heddle so that when you raise and lower the heddle, when you bring it forward to beat your project, the warp ends move through the slots and holes without constriction. So you must match up your warp selection with the heddle you will be using. The Kromski Harp has 3 dent sizes available – 8, 10 and 12 dent. You can change your dent size or you can choose a different warp material (or do both). You can always use a thinner warp in any dent size, but you never want to attempt to use a warp that will be too thick/heavy for the dent size you want to use.
How many dents are in each heddle?
The list below gives the number of dents in each heddle. In other words, this is how many holes each heddle has. In order to determine the number of threads (ends) this number is doubled to account for the slots as well.
8”
5 dent = 20
8 dent = 32
10 dent = 40
12 dent = 48
16”
5 dent = 40
8 dent = 64
10 dent = 80
12 dent = 96
24”
5 dent = 60
8 dent = 96
10 dent = 120
12 dent = 144
32”
5 dent = 80
8 dent = 128
10 dent = 160
12 dent = 192
How Long are the Beam Strings for each size loom?
8″ – 69.5″ each side
16″ – 69.5″ each side
24″ – 90″ each side
32″ – 115.5″ each side
My first project looks pretty good, but the left and right sides look “soft.” What am I doing wrong?
There are techniques when weaving that can prevent this from happening. But the likely culprit is how you tensioned the warp on the rear beam. Use a very stiff foundation or our beam sticks. This will prevent the warps ends on your left and right edges from collapsing while they are tensioned onto the beam and being loose when you weave.
The width of my finished projects is less than I had planned. Is there a way to maintain my planned dimensions?
To a certain extent this will always happen, but you can limit the effect by making sure that when you throw your weft material, you allow enough slack in it so that when you beat your project, you have enough length to allow it to do the over/under thing without pulling in from the left and right sides. Practice.
How do I dress my heddles when using two heddles?
Not difficult but the key is staying organized and working systematically. Let me break it down to the smallest warp in the world – four ends. We will call these ends 1, 2, 3 and 4 from left to right. Number 1 will go thru a hole on the rear heddle and numbers 2, 3, and 4 will go through the first slot next to number 1. Coming directly forward to the front heddle, ends 1, 2 and 4 will go thru the same slot while number 3 will go through the hole next to the first slot. When using just one heddle, you are weaving with the heddle in the up or down position for a total of 2 weaving positions. With 2 heddles, you have to manage both heddles so you have 4 weaving positions. It looks something like this: Position 1 – both heddles up Position 2 – front heddle up, rear heddle down Position 3 – front heddle down, rear heddle up Position 4 – both heddles down.
How do I set up the Second Heddle Blocks on the Harp Forte when using the Stand?
You’ll need to move the stand down a hole and flip the bolt around so that the wing nut does not get in the way of the rear heddle. Then you’re all set!
